debt, Family, Food, money, post partum, Stay at Home Mom, Uncategorized, Women, workout

New adventures…..we are SO ready!ย 

I have been away from blogging because we have been preparing to move. We have been looking forward to moving for at least a year. We finally found a place that was best for us. So today is moving day! 

When we first moved to Virginia we had never been here so we just picked a place we thought was good temporarily. And it was. But, living in an apartment gets old quick! We saved a bunch of money so that was probably the best part. The other great part is that if something breaks you just call the complex and they fix it. Honestly, that the best part about renting, period. We bought a house in California and it was ok. But, we started Dave Ramsey’s Financial peace after buying and quickly figured out we shouldn’t have. It wasn’t expensive for us. But we would have rather followed his plan beforehand. So anyway, fast forward to today. We are starting back on his plan after taking a break to move. It will be a challenge at first but after a month…probably two we will be set again. I am excited for our new adventure with moving and getting back on track. 

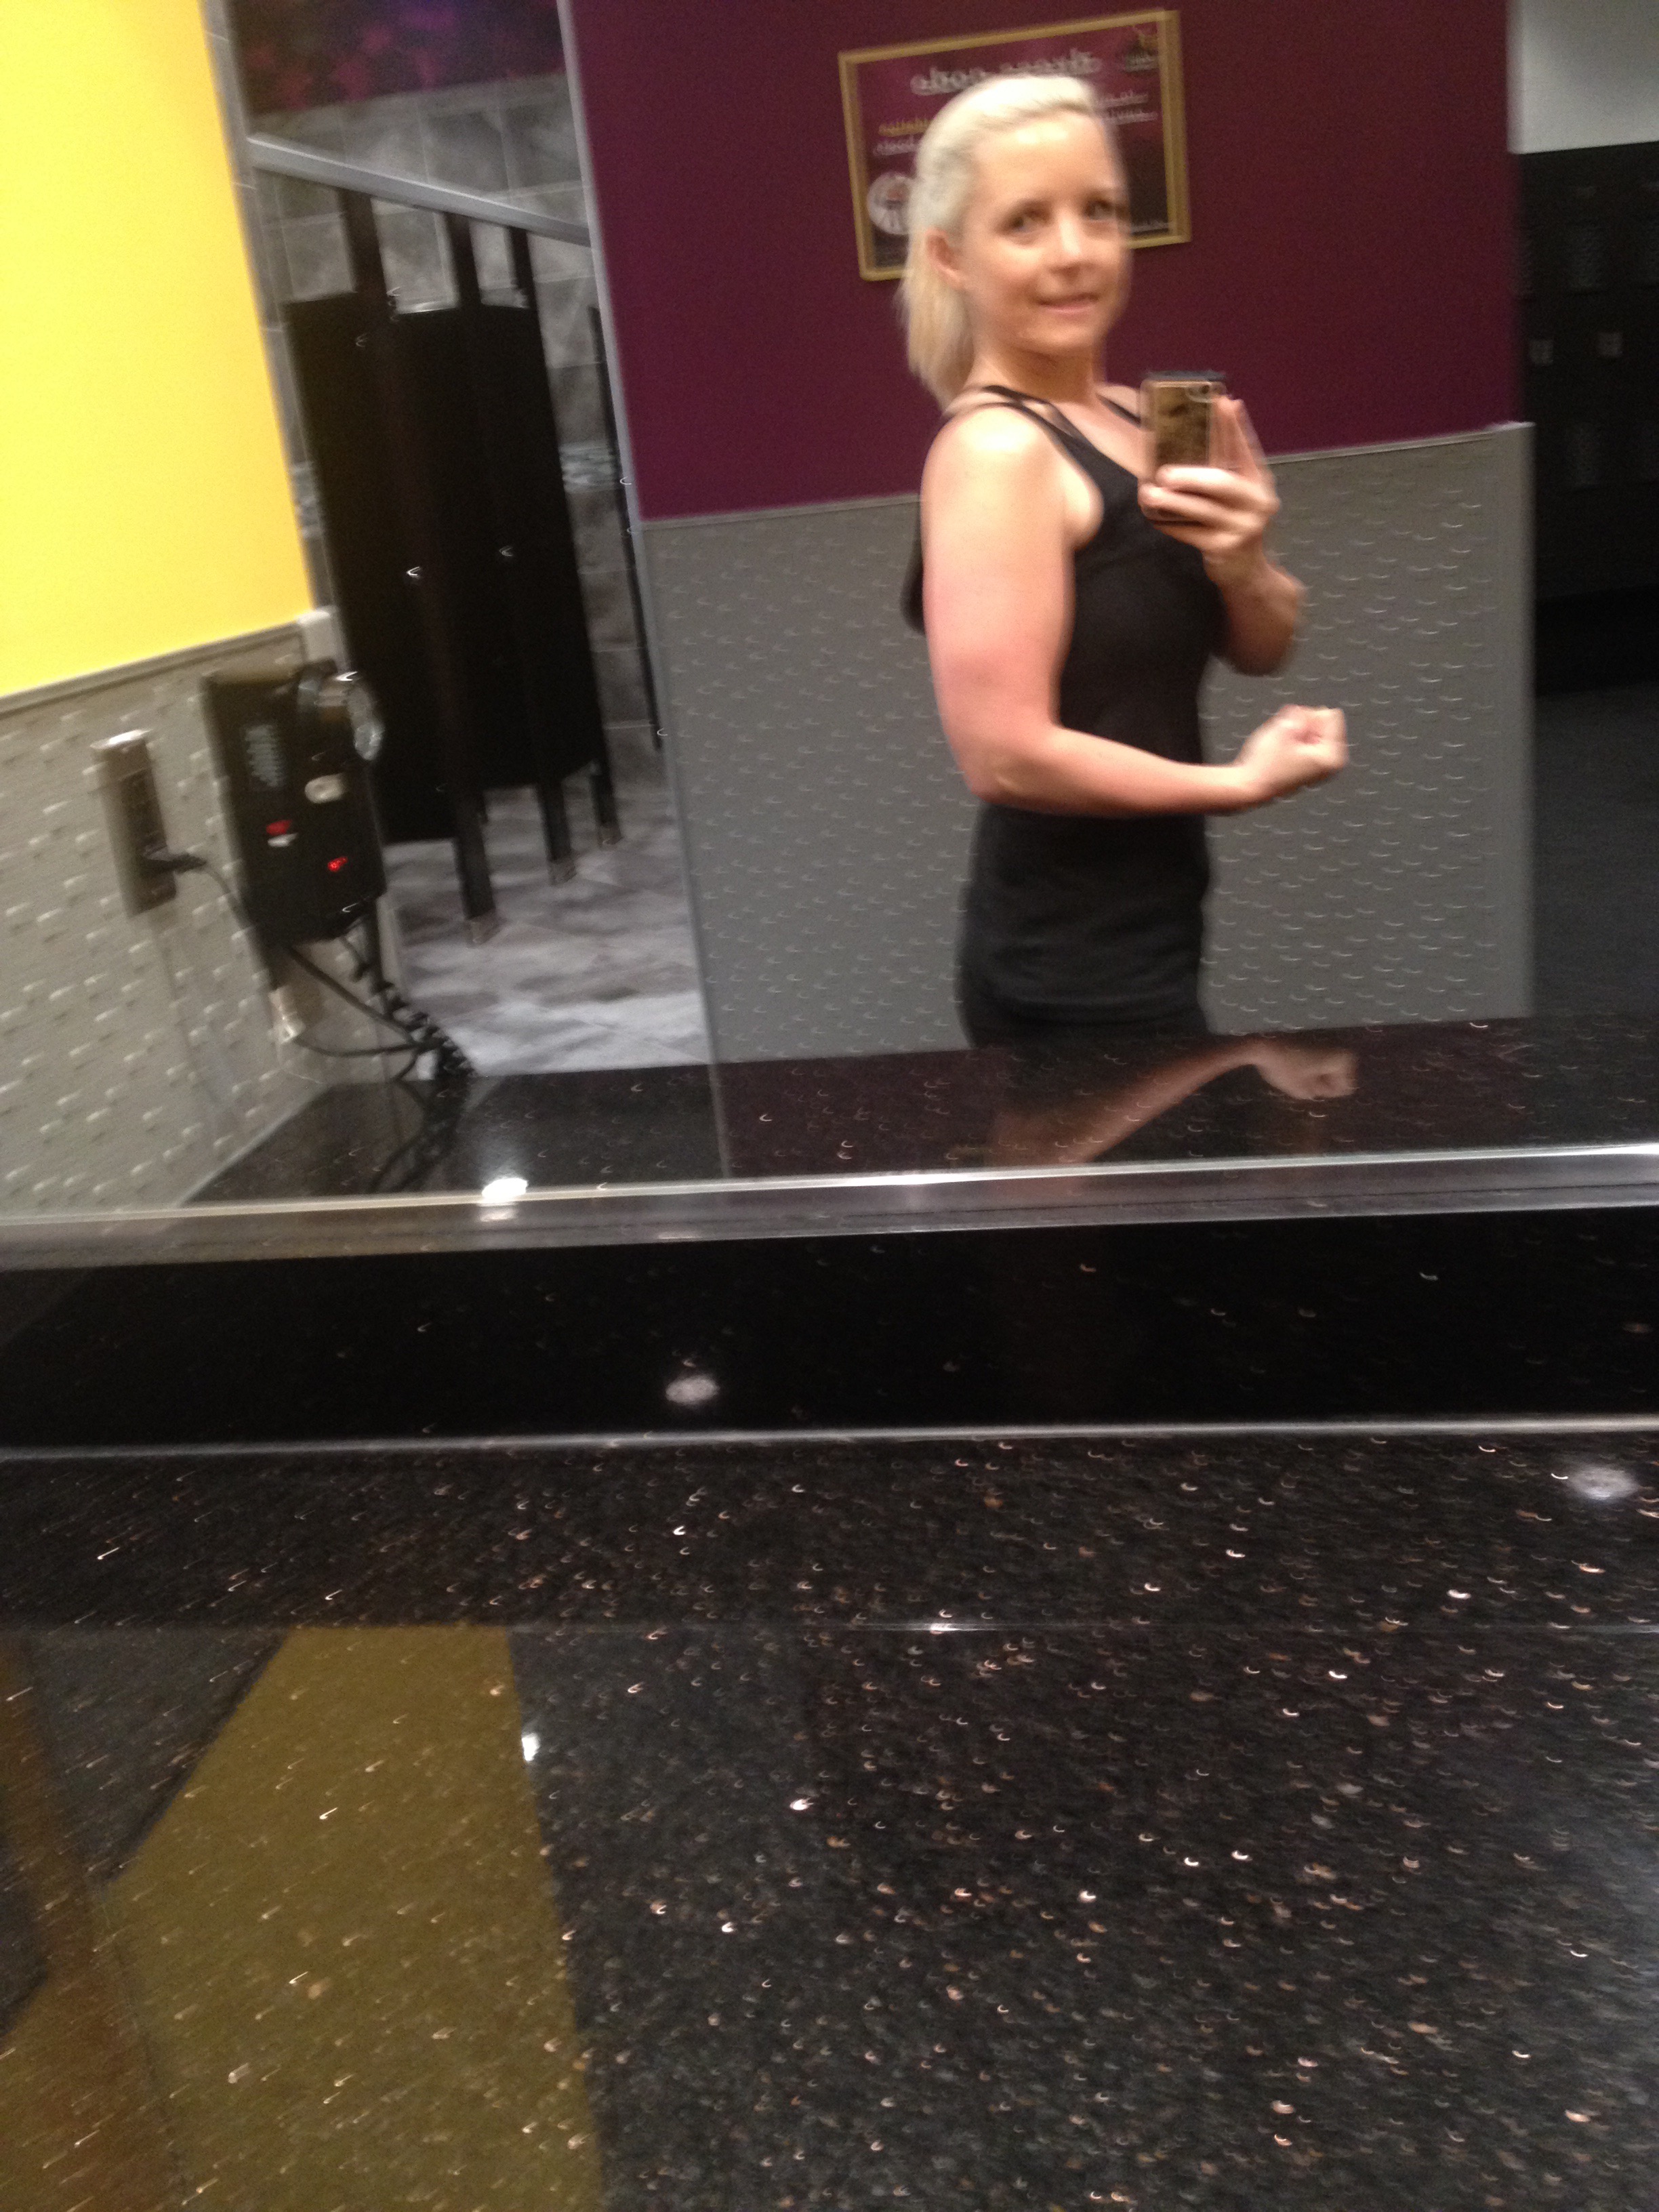
The only kinda bummer thing is my last day at the gym was yesterday. I’ve come so far after this pregnancy but I know I can keep it up outside the gym. After our first kid was born I lost weight and toned up great without the gym. So, I know how to do it which is great. Starting Monday I am going to be on my new “get fit” workouts. It’s exciting! New start, new location and super positive outlook on life. 

Hers my last day at the gym pic. 
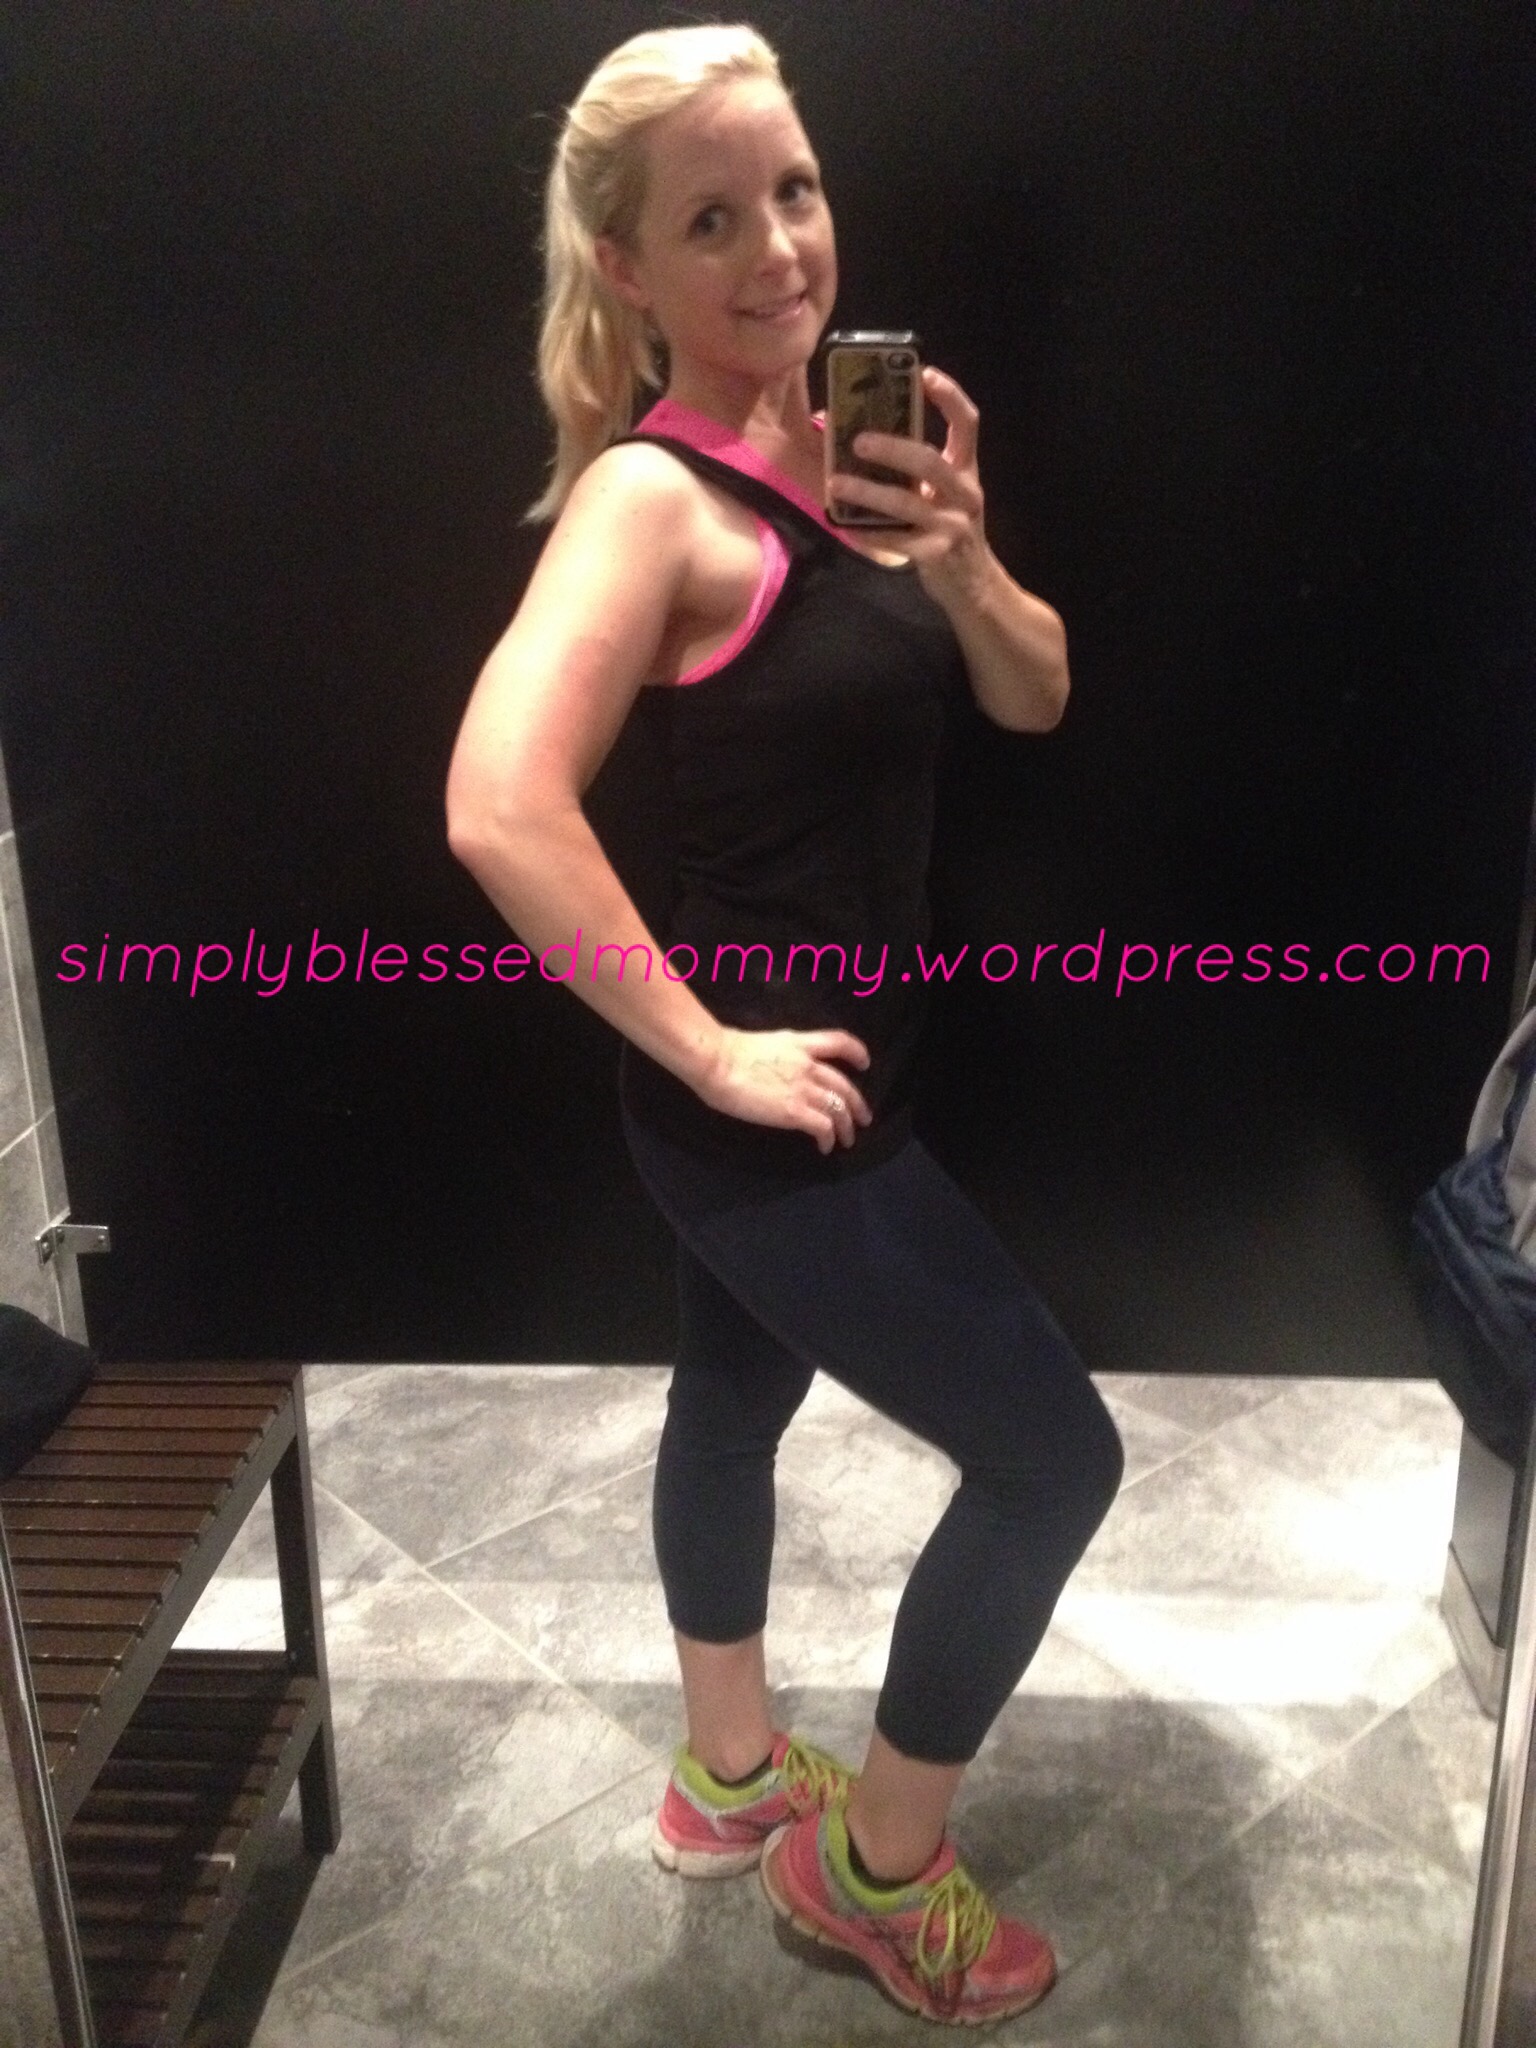
I am under pre pregnancy weight and want to slim down and tone up in the next few months. My goal is not to be skinny. My goal is not to be hugely muscular. My goal is to be toned and slimmer.  

The absolute best part is that we are living in our “dream” neighborhood now. Across from a golf course, kid friendly area, people always outside enjoying the weather and a very clean area. When we got to Virginia we drove through this area and said “one day we would love to live here”. We are so stoked! We are currently in the middle of our move but it’s nap time for the boys so I took a much needed blogging break ๐Ÿ˜‰ Oh! And I almost forgot to mention, we are now going back to our original church we started at when we got here. AMEN to that! I’ve been praying we go back because I absolutely love the worship music. It reminds me of North Coast Church in Southern California. It’s my way of worshiping God. Everyone has a way to worship and that my way of connecting more with God. 

So cheers to amazing time, exciting new adventures and living out one dream at a time. I will be able to blog more also ๐Ÿ™‚ So cheers to that! 
Live happy

Live your dream

But always

Live simple

breastfeeding, Family, Food, post partum, Stay at Home Mom, Uncategorized, Women, workout

Yummy and Healthier Pancakes

Our family absolutely loved this recipe. It’s easy, fast and we had all the ingredients already. Nothing out of the ordinary is needed for these pancakes. I even was able to try out the new avocado oil from Costco. I love the healthier oil options we have these days. (Picture below) I hope you get to make these and enjoy them as much as we all did. And not to mention….toddler approved ๐Ÿ™‚


Ingredients:ย 

1 cup Unbleached all-purpose flour or whole wheat ย flour (I used 1/2 cup unbleached flour and 1/2 cup whole wheat flour and only King Arthur brand flour)

1 Tbsp Raw sugar

2 tsp Baking Powder

1/2 tsp Salt

1 cup Silk Almond Milk

2 Tbsp Avocado oil or Melted butter (I used butter the first time around)

1 Egg

1/4 tsp All Spice

Splash of Real Vanilla
Directions:

1. Whisk together flour, sugar, baking powder, all spice and salt in a small bowl.

2. In a separate bowl, whisk together Silk, oil/butter, vanilla and egg.

3. Add flour mixture to egg mixture and stir with a wooden spoon just to moistenโ€”a few lumps are fine.

4. Cook pancakes on a cast iron pan with avocado oil over medium heat. I put just enough oil to cook the pancake, maybe 1/4 tsp.

5. Cook until you see little bubbles and flip, continue cooking until done. Maybe 1 minute longer once flipped.
I served these delicious pancakes with uncured turkey bacon from Costco (I highly recommend this turkey bacon brand-picture below) and scrambled eggs with almond milk whisked into the eggs.


Have a wonderful Mother’s Day weekend!!

Live healthy

Live simple

Family, Food, post partum, Stay at Home Mom, Uncategorized, Women, workout

Coffee Creamer and Awesome Fat Burning Workout

I am a firm believer that black coffee is best. I typically (like 99% of the time) do not add anything to my coffee. But, the other day I was at the store and saw Almond Milk creamer. I love almond milk and very rarely get cow milk. So I decided to give it a try. Holy cow y’all! It taste so darn good. It is non-gmo, non-dairy, lower calorie deliciousness. I bought the Carmel flavor. If you need to add stuff to your coffee this would be a very good choice. This is the bottle and back of the bottle information. 

As for my amazing workout this morning…..I need to get my body firmer, if you know what I mean. So I decided to try pushing myself a bit. I try to run on the treadmill at the gym for 20 minutes and the least. With my body type I have found that cardio is what “slims” me down. I’ve tried doing a lot of weight lifting and my goodness. I do not like it. Lower the weight and up the reps is best for me. If I mix the two together my body starts to shape out nicely.  That is why I do a lot more cardio. On to what I did. I started out with 1 minute of walking at a 1 incline, then I ran 1 minute. After the run I slow it down to a walk, increase my incline by 1 and walk for a minute. After that minute of walking, I run 1 minute. And I repeat these steps (literally, ha!) until I get to a 10 incline. Once I complete my 10 incline I lower it back down to 1 incline and run for a minute. Then cool down for a few minute. I felt like I was going to throw up. It was that amazing! Ha! It is truly an amazing “fat burning” workout. 
Have a wonderful Tuesday!!! 
Live healthy

Live fit

Live simple

Family, Food, post partum, pregnancy, Stay at Home Mom, Uncategorized, Women, workout

Pizza recipe revised and absolutely perfect!ย 

When I first set out to make pizza at home from scratch I found one recipe and kept tweaking it. I now have the best and most delicious recipe that I want to share. I love simple, I love easy and I love good food! I also found a pizza sauce without sugar added and without other junk added. It was maybe a dollar more but gosh, for $2.50 and using only half the bottle is darn cheap. Picture is down below.  Also, I cut out the oil out in the recipe and the crust is spot on amazing! I hope you get to try this recipe out, we absolutely loved it. 

Ingredients:

1 cup warm water

2 1/2 tsp yeast (I only use Fleischmann’s brand)

1/2 tsp raw sugar or regular sugar if that’s all you have 

1 tsp garlic powder

1/2 tsp salt

2 1/2 Cups White whole wheat flour (I only use King Arthur brand)or just regular white flour if that’s all you have

Shredded cheese

Pepperoni or whatever topping you like

Pizza pan
Directions:

Warm you mixing bowl by adding hot water and let it sit for 1 minute. Pour out the water and then start your first ingredient.

Add 1 cup of warm water to mixing bowl, yeast and sugar. Mix the yeast mixture enough to make sure all the ingredients are wet. Let it sit for about 5 minutes until yeast rises. 

Add flour, salt and garlic powder and mix the ingredients with a dough hook until all are mixed together. 

Lightly flour a counter and put dough on it. Let it sit for about 10 minutes. Sometimes I let it sit more if I get sidetracked, which is very easy with kids. Ha! 

Now is the time to preheat your oven to 425 degrees. 

Once the dough is done sitting, roll the dough out into a circle or whatever shape you need for your pan. I make sure the dough is about an inch over on the sides so I can roll it up to make crust. 

Lightly spay your pan with cooking spray.

Put the pizza dough on pan and roll the sides up two times. Make a small crust border. Not sure how else to explain it, ha! 

Set aside and let it sit for about 10 minutes. I know, sounds like a lot of waiting…..but you want a really good tasting homemade pizza right? It also gives me time to clean up the kitchen and tend to my boys. That way I don’t have a mess to clean up after dinner is done. 

After the 10 minutes, add the pizza sauce.

Add the desired amount of cheese

Add your toppings. Our favorite is pepperoni. I use the Applegate pepperoni brand. It’s way healthier than other brand. And they do not have nitrates in it. Thank goodness for that. 

Put in your preheated oven for 20 minutes. Check the pizza to see if it is brown on the edges. If not keep in the oven for 5 more minutes. Our pizza came out perfect in 25 minutes. 

Cut and enjoy! Try not to eat the whole pizza at once. Hehe! 
If you have any questions just ask me! 

Live healthy

Live simple

Family, Food, post partum, pregnancy, prenatal, Stay at Home Mom, Uncategorized, Women, workout

Simple Two Ingredient Ice Cream

Our family absolutely loves ice cream. If I could eat it all the time and not get fat, I would. But since ice cream is fattening I wanted to try making banana ice cream that I see online a lot. I was skeptical at first but once I tasted it, oh man is it good! I tried strawberry ice cream first and will be testing out different flavors very soon. It is very inexpensive and so darn yummy, you should try it out. It is also toddler and nine month old approved. They absolutely love it! 

Ingredients:

Bananas 

Strawberries

Directions:

Wash, cut the tops off the strawberries and put them in a freezer bag and freeze

Peel the bananas, cut into pieces, put them in a freezer bag and freeze. 

Once frozen, take the bananas and strawberries out. 

Put the bananas in the food processor and blend for about 3 minutes or until it has a smooth/ice cream like texture. 

Out in the frozen strawberries and blend for a minute. It really depends on if you like chunks of strawberries or just smooth. So really gauge the blending on your liking. 

Done

Scoop and serve. It’s hard not to eat a lot at once ๐Ÿ˜œ
Live healthy

Live simple

Family, Food, post partum, Stay at Home Mom, Uncategorized, Women, workout

Family favorite meal (lose weight meal) that is budget friendly and healthy

We all have days when we are not feeling our best. We feel bloated, fat and just down right yucky. When I start feeling this way I make my favorite meal and eat it often. Mainly at dinner time. After eating it for dinner the first night I feel so much better the next day. This is also my key way to losing the baby weight this time around also. I lost the baby weight twice as fast this time around. The first time it took me a bit longer. It tastes really really good too! It is approved by my husband and toddler also. So this is our go to meal. It is simple, easy and budget friendly. We are doing Dave Ramsey’s Snowball so this is a great meal on a lower meal budget.

Ingredients:

1.5 lb Organic Ground Turkey (From Costco, or 1 lb package from the store)

2-3 Cans Black beans

3 Bell Peppers

4 Tbsp Taco Seasoning

Organic tortilla chips

Cast Iron pan. You need to add everything together. A dutch oven would work just fine also.

This meal feeds us 3 for about 4 days.

Directions:

  1. Cook ground turkey on stove and set aside. *picture below

2. While turkey is cooking cut up Bell Peppers *picture below

3. Cook the bell peppers for about 10 minutes on medium heat.

4. Drain 1-2 cans of black beans. Depending on how many cans you put in your recipe. If you put in 3 cans, drain 2 cans. If you put in two cans, drain 1 can. Make sure to put in one can of black beans, not drained, into the recipe.

5. Add the cooked turkey, black beans and taco seasoning to the bell peppers. Mix together and cook for about 5-10 minutes.

Done!


Enjoy! And enjoy often! I hope this concoction makes you feel better as much as it did for me.


Live Healthy

Live Simple


breastfeeding, Christmas, Family, Food, post partum, St Pattys Day, Stay at Home Mom, Uncategorized, Women

Red Velvet Baked Donuts with Cream Cheese Frosting

Ok, so I have to get this out of the way. My donuts are not red because the recipe calls for 1 Tbsp of red dye and we had 1/2 Tbsp…..so we used all the dye colors HA! They are green and might do this for St Patrick’s Day coming up.

I found this recipe about 1 minute after my son and I decided to make donuts. They are amazing!!! So good I wanted to eat way more than one at a time. I highly recommend recipe for baked donuts.


Ingredients:

3/4 Cup Granulated Sugar

1 1/2 tsp Unsweetened Cocoa Powder

1/2 tsp Salt

1/2 tsp Baking soda

1 1/4 cup Unbleached all purpose flour

1/2 cup Buttermilk (I used almond milk and vinegar to make mine)

1/2 cup and 2 tsp of vegetable oil

1 egg

1/2 tsp vanilla extract

1/2 tsp vinegar

1 Tbsp red food coloring


Cream Cheese Frosting Ingredients:

1 cup Powdered Sugar

1 oz Cream Cheese

1/2 tsp vanilla extract

1 tsp of almond milk or regular milk


Directions For The Donuts:

  1. Preheat oven to 350 degrees
  2. Spray donut pan with non-stick spray
  3. In a large bowl add flour, baking soda, salt cocoa powder and sugar. Mix and set aside.
  4. In a medium bowl, whisk together; egg, buttermilk, vegetable oil, vanilla, food coloring and vinegar.
  5. Pour the wet ingredients into the dry ingredients and whisk together. Do not over mix but mix enough so you do not have clumps in the batter.
  6. Fill the donut ring, I filled it to the top of the donut mold but not high enough to cover the middle.
  7. Bake for 12 minutes. Take out of the oven and let them cool on a cooling rack for a few minutes.

Directions for the Cream Cheese Frosting:

  1. Combine the Cream Cheese, powdered sugar and vanilla in a bowl. Mix (whisk) until all together.
  2. Add 1 tsp of almond milk or regular milk and mix until creamy. If you need to add more to get the perfect consistency, add a very small amount at a time.

I dipped the cooled off donuts in the frosting until coated on one half of the donut. You can add sprinkles if you like. And oh my goodness….they taste amazing!! Enjoy!!


Live Sweet

Live Simple


Recipe From Homemadehooplah.com


Family, Food, post partum, Stay at Home Mom, Uncategorized, Women, workout

Super-set workout I love

I have found my new favorite super-sets. I actually made it up as I went because I want an awesome workout daily! I typically have about 30-45 minutes a day that I can workout and I want to get muscle definition. Because I do not have a lot of time I put my workouts together and boy does it burn! I absolutely Love Love Love it! The number one reason people tell me they cannot lose weight is because they do not have the time. I feel ya, but honestly, we all have time. We just have to make it. So I really want to encourage you to start somewhere and go workout. If you do not have a gym membership (another huge excuse I hear) then buy dumbbells from Target or Walmart and workout at home. I did not have a gym membership for 4 years and finally have one again. Before the gym membership I had 2-10lb dumbbells that I worked with. It is not a lot but it worked for me. I was able to lose my baby weight the first time with at home workouts, walking/jogging outside and eating better. If you really want it you have to believe in yourself and do it! At first it sucks but honestly it is the best thing you can do for yourself. Get healthy, get fit. Ok so on to one of my amazing workouts….I have a few but I will share the one I did today and post the rest later. Now remember these are super-sets not one set, rest, one set, rest. No resting involved. I rest my muscle when I workout a different muscle.

Back workout Superset

Bent over row with palms facing your body, return to starting position

Bent over row with palms facing each other, return to starting position

Bent over reverse fly, return to starting position

Repeat for a total of 12

Rest: Just kidding! Do 20 lunges each side

Rest: Nope

Do the Top super-set again

Do 20 more lunges each side

Do the super-sets again

Do 20 more lunges each side.

Done!

On to the next workout, abs and legs. Do these workouts all in one set, this time you rest for one minute in between.Remember super-sets, its a better burn and a faster way to get all your muscles worked.

Grab a Mat:

30 crunches

30 side crunches-each side

50 bicycle crunches

20 push ups

20 side plank dips/lifts

50 outside leg lifts

50 inside leg lifts

20 side plank dips/lifts on opposite side

50 outside leg lifts on opposite side

50 inside leg lifts on opposite side

Rest one minute and repeat for a total of 3 sets

Remember to stretch, I am not very good at the whole stretching thing. I typically skip it if I do not have time, but most people need it.

I really hope you try this workout and if you have any questions just ask!

I have been doing this workout for two weeks now. Between this workout and the other ones I will post I have been seeing results faster! I am 8 months postpartum and have recovered faster this time around and am now at the toning and improving my body part. I just started working out with heavier weights and see a big difference. I am not skinny and not super toned just yet ๐Ÿ˜œ I absolutely love working out and love to eat. So finding a balance has worked for me. I posted two picture of me from this morning. 

1. My tank top is to big on me now, huge. 

2. I am not toned as you can tell but my muscles are getting bigger, thankfully! 

3. Don’t buy targets workout clothes with drawstrings. It literally bunches up around your waste and make me feel like I have a bigger stomach ๐Ÿ˜Ÿ

4. Trying to take a “flexing” picture after your workout leads to a blurry picture hahaha 
Live fit

Live healthy

Live simple


Family, Food, Stay at Home Mom

Brown Rice veggie Sushi

Out of trial and error I have truly found the best brown rice sushi rice recipe. Because I absolutely love to share when I find a good thing I couldn’t help but share this one. Sushi rice is not really “healthy” so I wanted to find a recipe I could make at home with brown rice. The first recipe I used was rated 4 stars so I tried it out. Oh my goodness, gross! It was dry, insanely salty and just all around disgusting. I then tried a different recipe and boy is it yummy!! I made vegetarian sushi for my husband and I last night. I surprised him and he loved it! It is super easy and I hope you get the same yummy result that we had.

Brown Rice Ingredients:

1 2/3 Cup Water

1 Cup Brown Rice (I used Della Organic Light Brown Rice from Costco) *picture below

3 Tbsp Rice Vinegar (I used Nakano Organic Rice Vinegar) *picture below

2 Tbsp Sugar (You could get away with 1 Tbsp)

Instructions:

1.In a medium saucepan (I only have a dutch oven size from Pioneer Woman and it worked great) bring water to a boil then add rice. Stir and lower heat to low and cover. Cook for 25 minutes or until tender.

2.In a small saucepan; add vinegar, sugar and salt. Cook on medium heat until sugar dissolved, about 2 minutes. Make sure to stir occasionally. Put pan aside to cool off a bit.

3.  Once the rice is done cooking slowly and carefully stir in the vinegar mixture making sure to coat all of the rice.

4. Set the rice aside to cool down before making the sushi.


Ingredients I used for making veggie sushi:

1 Medium size Cucumber

1 avocado

Brown Rice Sushi from above recipe

4 Seaweed papers (the pack I bought had 10 papers)

Sushi mat but not required. It is easy to use plastic wrap to put under the seaweed.

You cannot forget Soy Sauce, we only use   Kikkoman soy sauce


Instructions:

  1. Peel the cucumber skin and cut the cucumber in half. Cut the middle part of the cucumber out, it will look like a boat. Then cut the cucumber, lengthwise, into thin strips. Set Aside *picture below
  2. Cut the avocado in half. Take the seed out and take the skin of the avocado. Put the avocado, cut side down, and slice the avocado into thin slices. Set Aside *picture below
  3. Put a piece of plastic wrap (Or sushi mat) down on a clean and dry counter. Put one Seaweed paper down. Wet hands a bit ( Wetting your hands will prevent rice to stick on your hands) and then hand put the rice onto the seaweed. Put a very thin layer of rice on seaweed. Leave about 1 inch of the seaweed on one of the longest side of seaweed free of rice. *picture below. About 1 inch on the opposite side put about 4-5 thin slices of cucumbers. Put about 4 thin slices of avocado on top. *picture below. Slowly roll up the sushi tightly starting on the side with the veggies. Once you are rolled up to the side of the wrap with no rice at the end, wet your finger and wipe the seaweed end and seal together. Set Aside.
  4. Repeat step 3, I was able to make 4 rolls.
  5. Once finished, take a sharp knife and cut the rolls to your desired size. I like my sushi 1 inch thick.
  6. Plate and Enjoy!


I hope I explained it in as much detail as needed. And I hope it is not confusing. If you need clarification on anything just ask! I can try to explain it better.

I hope you enjoy the sushi as much as we did! I love love love this veggie sushi and completely believe it taste like the sushi get from the restaurants. I now do not need to spend a ton of money going out to eat sushi ๐Ÿ™‚

*You can use any veggies you want, those two are my absolute favorite! I could eat this daily!


Live Satified

Live Simple

Family, Food, Stay at Home Mom, Uncategorized, Women

“Perfect” Sweet Tea Recipe

This is a recipe I have been making for my family for a while now. This is our favorite “perfect” sweet tea recipe.

Ingredients:

8 cups Water

3 Family Size Lipton Iced Tea bags

2 Cups Sugar

4 Cups of Ice

3L Pitcher


Directions:

In a small saucepan boil 2 cups of water. Once boiling add the tea bags and bring to a boil. Bring to a boil again, let it boil for 2 minutes. Once the 2 minutes are up take the tea bags out and add the two cups of sugar. Bring to a boil and boil for 2 more minutes. Once the 2 minutes are up turn off the heat and set pan aside to cool off a bit. Fill the Pitcher up halfway with ice (about 4 cups) and add the rest of the water, 6 cups. Pour the tea/sugar mixture in the ice water pitcher and stir.

Done! Easy Peasy!


I hope you enjoy the Sweet tea as much as we do!


Live Sweet

Live Simple